Appearance
 Wiring Tool
Digital objects can be placed in the workspace and then connected together using the wiring tool.
Connecting Objects Together
First, place all the objects you want to connect together onto the circuit workspace.
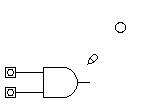
Next, move the cursor over the point where you would like to start wiring. The cursor will change shape if possible connection points are found, as shown below. Click the left mouse button to begin.
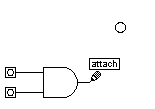
You don't have to connect a wire directly from one point to another. You can click the mouse at any point on the workspace and construct a wiring path. For example:
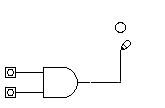
Finally, move the cursor over the point where you wish to terminate the connection. Again, the cursor will change shape if possible connection points are found, as shown below. Click the left mouse button to finish.
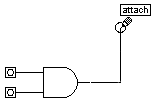
Remember, you cannot start to draw a wire and then attach it to something later. You must complete the wiring process once started. If you select another toolbar item during wiring, the process will be terminated. You can also abort the wiring process at any time by pressing the Esc or Delete keys.
Connecting A Wire To Another Wire
Using the wire tool, it is also possible to connect two wires together. In this example, an inverter has been added to the circuit. We want to attach the input of the inverter to the wire which is connected to the output of the AND gate. You start the wiring process in exactly the same way as shown earlier.
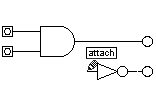
Next, move the cursor over the wire which is connected to the output of the AND gate. The cursor will change shape indicating that a connection to the wire can be made.
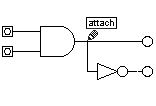
Press the left mouse button to finish. A wire 'joint' is displayed, indicating that the two wires have been connected.
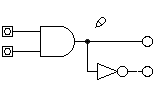
A wire joint can be selected using the object selector tool and moved to another location. You can right click on a wire or joint and then select the Delete option to remove them.
When a wire path is selected using the object selector tool, small rectangles will appear between the source and destination connection points. The intermediate wire points can be relocated by moving the mouse over a bounding rectangle, pressing the left button and dragging it to a new location.
Connecting Outputs Together
Using the wiring tool, you can connect a single output to one or more inputs. However, you cannot connect an output to another output. If attempts were made to connect two outputs together in a real circuit implementation, it is highly probable the devices would be damaged. Digital Works displays an error message should you try and do this.
However, you can connect tri-state outputs together. This is because an inactive tri-state has an output which is floating. The Digital Works memory device has tri-state outputs, to enable multiple memory components to share the same bus. However, care must be taken to ensure that only one device tries to access the bus at any point in time. If two or more devices with tri-state outputs are enabled at the same time, bus contention will occur.